- Advertisement -
Facebook is one of the most popular Social Networking Websites. To keep it, more Genuine & having Genuine people over it, Facebook has updated its various security features, as well as, set some limitation/restriction to avoid frequent change in General Settings.
- Advertisement -
- Advertisement -
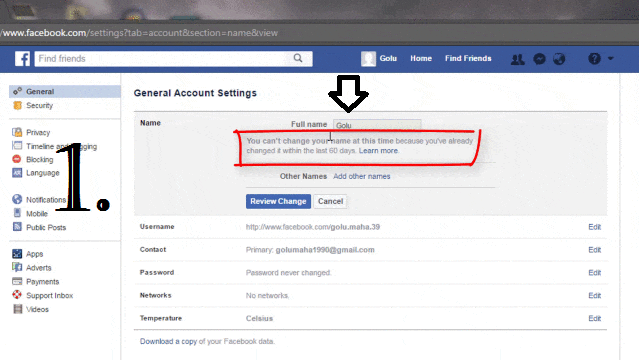
For Example: If you change your name of Facebook Profile, you can’t change it again within 60 Days Time Limit.
Sometimes, it also asks your Identity Proof to confirm/verify the genuineness of your Facebook Profile. So, if you don’t want to upload your Identity Proof of Facebook and want to Change Facebook Profile Name within 60 Days Time Limit, Here is the solution.
Do You Know? Make/Use Single Name on Facebook Profile
Must Read: Convert Your Profile Into a Facebook Page to Add More than 5000 Friends
Step by Step Procedure has been explained herein Theoretically, Graphically [GIF Image] & with the Help of LIVE Video Tutorial:
Steps To Be Followed:
Step 1. Log in to your Facebook Account.
Step 2. Open A New Tab and Visit this Link:
Facebook. On this Page, by assuming your facebook account is Hacked, Facebook will look at the recent change made in your profile, like: Name Change, Password Change, Email Id change etc.
Here is the TRICK, It will show you the list of all your previous name which you had on your Facebook Profile, just have to select any one & You Gotta Change your Name. so, let’s see further Steps.
Step 3. After visiting above Link, you will see “Let’s Secure Your Account” Box, Just click on ‘ Get Started”, as shown in Image no. 3 of below GIF Image.
Step 4. It will start to analyze the recent changes made in your profile, after this, Click on “Get Started” button, as Shown in Image No. 5 in above GIF Image.
Step 5. Now, on the next screen Click on “Continue” and it will ask you to create a new Password and Click on “Next”.
Step 6. This is the step for which you are with MASHNOL. In the Next Window, you will get your Basic info on your
Facebook Profile, like Name, username, email address etc, select the things which you want to Keep. Which you don’t select, Facebook will delete that one. Here, Just select your previous name showing in “
Select you Name” field. Just do it and click on “
Next“.
Step 7. In Next Screen, you will be shown some recent activity eg. Likes, Post or Comments, in which you were involved, select anyone if you want to delete. otherwise, you may directly go through to Next Screen by clicking on “Skip” button.
Step 8. In Next Screen, just do the formality & click on “Next” Button, following with “Go to News Feed” Button.
Step 9. Voilla. that’s Done. Now, your Name is changed. Enjoy:-)
Also Watch LIVE Video Tutorial
Must Check It Out:

